Grilled chicken breasts often get a bad rap for being bland or dry. But when you approach them with a little patience and a good technique, they can be transformed into something truly satisfying. This recipe is about teaching that secret—marrying simple seasoning with smart grilling to keep the meat juicy and flavorful.
There’s something about the process that’s almost meditative. Watching the chicken develop those beautiful grill marks, smelling the smoky aroma, it feels like a small victory every time. Plus, once you nail this, it’s perfect for salads, wraps, or just a straightforward plate with your favorite veggies.
Why I keep coming back to this grilled chicken
Every time I master this technique, it’s like reclaiming a bit of control in the kitchen. That smoky aroma, the perfect juiciness, it’s a reminder that simple can be spectacular. Plus, it’s endlessly adaptable—serve it with salads, tucked into tacos, or sliced over grains. No matter what, it’s a reliable, satisfying go-to.
Breaking down the ingredients for juicy results
- Chicken breasts: Choose thick, uniform breasts for even cooking—forget thin cuts, they dry out fast.
- Salt and sugar: Simple brine ingredients that tenderize and flavor—don’t skip this step.
- Lemon juice: Brightens the flavor and adds a subtle tang—use fresh for the best zest.
- Olive oil: Helps prevent sticking and promotes a crisp sear—use good-quality oil.
- Herbs and spices: Fresh thyme or rosemary work beautifully, but even paprika or cumin add depth.
- Lemon wedges: A bright finishing touch that cuts through the smoky richness.
- Optional marinade: A quick mix of garlic, herbs, and olive oil can elevate the flavor—skip if you prefer pure simplicity.
Tools of the trade for perfect grilled chicken
- Grill or grill pan: Provides that smoky, charred flavor and crispy exterior.
- Probe thermometer: Ensures the chicken reaches the safe, juicy temperature.
- Basting brush: Helps apply oil or marinades evenly.
- Tongs: Allows easy flipping without piercing the meat.
- Cutting board and sharp knife: For slicing and presentation.
Grilling the perfect chicken—step by step
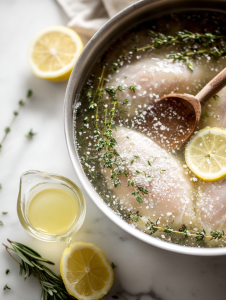
Step 1: Start with a simple brine—salt, sugar, and a splash of lemon juice in water. Submerge the chicken breasts and refrigerate for at least 30 minutes. This step makes the meat tender and helps it stay moist during grilling.
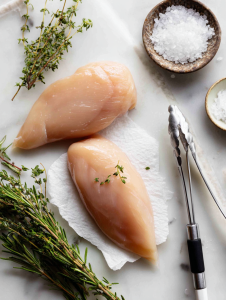
Step 2: Pat the chicken dry thoroughly. A dry surface helps get that perfect sear—crisp on the outside, juicy inside.
Step 3: Preheat your grill to medium-high, around 200°C (390°F). Use a clean grill grate to prevent sticking.
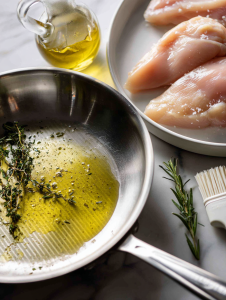
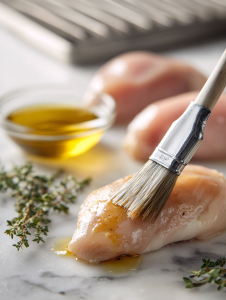
Step 4: Oil the grill lightly or brush the chicken with olive oil. Place the breasts on the grill, smooth side down.
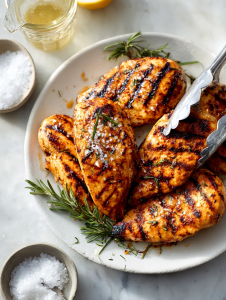
Step 5: Grill for about 6-7 minutes per side. Look for grill marks and a slight char—those are good signs.
Step 6: Flip the chicken carefully, and avoid pressing down. This keeps the juices inside.
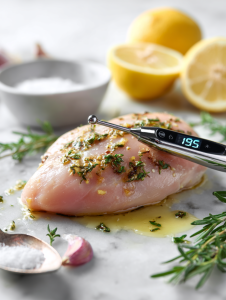
Step 7: Check the internal temperature—aim for 74°C (165°F). If using a probe, insert into the thickest part.
Step 8: Let the chicken rest for 5 minutes after removing from the grill. Tent with foil if you like.
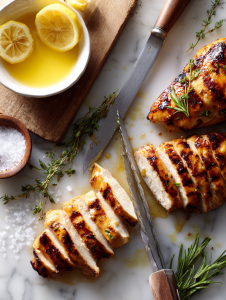
Step 9: Slice and serve with a squeeze of lemon or your favorite herbs.

Perfectly Grilled Juicy Chicken Breasts
Ingredients
Equipment
Method
- Combine salt, sugar, and lemon juice in a large bowl with water to create a brine. Submerge the chicken breasts and refrigerate for at least 30 minutes, allowing the meat to tenderize and stay moist.

- Remove the chicken breasts from the brine and pat them dry thoroughly with paper towels. This step helps achieve a crisp sear on the grill.
- Preheat your grill or grill pan to medium-high, aiming for about 200°C (390°F). Make sure the grates are clean and lightly oiled to prevent sticking.
- Brush the chicken breasts with a little olive oil or use a basting brush to coat them evenly. Place the breasts on the hot grill, smooth side down, and listen for a satisfying sizzle.
- Grill the chicken for about 6-7 minutes per side, watching for grill marks and slight charring. Use tongs to flip the meat carefully, avoiding pressing down to keep the juices inside.
- Insert a probe thermometer into the thickest part of the chicken and cook until it reaches 74°C (165°F). This guarantees the chicken is safe and juicy.
- Once cooked, transfer the chicken to a plate and tent loosely with foil. Let it rest for 5 minutes; this allows the juices to redistribute and keeps the meat moist.
- Slice the chicken breasts into strips or serve whole, garnished with a squeeze of fresh lemon and a sprinkle of herbs for bright flavor.

Notes
Key moments to watch for while grilling
- Look for deep grill marks and a slight charring—those are signs of good caramelization.
- Ensure the internal temperature hits 74°C (165°F). A probe thermometer is your best friend.
- Notice the juices run clear when you cut into the thickest part—no pink!
- The chicken should feel firm but not hard, with a slight bounce when pressed.
Common grilling mistakes and how to fix them
- Leaving chicken on the heat too long.? OVER-COOKED CHICKEN?—Reduce grill time or check temperature earlier.
- Not enough moisture retention.? DRYNESS?—Brine longer or add a marinade before grilling.
- Placing chicken on a dirty or dry grill.? STICKING TO THE GRILL?—Make sure the grill is clean and oiled.
- Guessing doneness by sight alone.? INCONSISTENT doneness?—Use a probe thermometer for accuracy.
Once rested, that chicken is almost too pretty to cut into. The smoky aroma, the crisp edges, and the juicy interior make each bite worth the wait. Feel free to experiment with herbs or a spicy marinade next time—this method’s a blank canvas. Just remember, it’s about the process as much as the final taste; patience and a good eye are your best tools.

Hi, I’m Anjali Arora — the curious heart behind Feast Chase.
To be honest, I’ve always felt most at ease in my own company. I’m not exactly a people-person (small talk still makes me cringe), but there are two things I’ve always loved deeply: animals and food.