Making this no-bake cheesecake is all about the messy, sticky process of crushing graham crackers and mixing cream cheese. You’ll hear the crackle of the crust as you press it into the pan, and feel the soft, cool cream as you fold in the whipped topping.
Chilling it in the fridge feels like a quiet, slow moment—waiting for that firm, smooth texture to set. No oven needed, just time and a steady hand to smooth out the top before it firms up overnight.
The gentle squish of the cream cheese mixture as you press it into the crust, the quiet hum of the fridge door as it chills, and the faint scent of lemon zest mingling with the buttery graham crackers—these small, honest sounds and smells anchor you in the simple act of making.
What goes into this dish
- Graham cracker crumbs: I use these because they’re reliable for that buttery, slightly sweet crunch. Skip if you prefer a gluten-free crust, but find a substitute that’s got a similar texture—like digestive biscuits crushed fine.
- Cream cheese: The base of everything—smooth, tangy, and essential. If you’re out, mascarpone can add creaminess, but it’s milder; sour cream can lighten it up, but won’t give the same richness.
- Whipped topping: I prefer heavy cream whipped until soft peaks, but store-bought whipped topping saves time—just make sure it’s well chilled, or it won’t hold up well.
- Sugar: Just enough to balance the tang—granulated works best, but honey or maple syrup can add different flavor notes if you want to experiment.
- Lemon zest: Brightens everything with a zingy aroma and flavor. Skip if you’re not into citrus, but it’s the little spark that keeps this from feeling too heavy.
- Butter: Melts into the crust, making it crumbly and rich. Margarine can work in a pinch, but the flavor won’t be quite the same—look for a good quality stick butter for best results.
- Optional toppings: Fresh berries or fruit compote add fresh, juicy bursts. Dried fruit or chocolate shavings can give a different texture—think about what you want each bite to deliver.

No-Bake Cheesecake
Ingredients
Equipment
Method
- Start by crushing your graham crackers into fine crumbs using a food processor or by sealing them in a plastic bag and pounding with a rolling pin. Transfer the crumbs to a mixing bowl.
- Pour the melted butter over the graham cracker crumbs and stir until evenly coated. Press this mixture firmly into the bottom of a 9-inch springform pan to create an even crust. Chill in the fridge while you prepare the filling.
- In a large mixing bowl, beat the softened cream cheese with a spatula or mixer until smooth and creamy, about 2-3 minutes. This helps achieve a silky texture.
- Add the granulated sugar and lemon zest to the cream cheese, then fold or mix until well combined. The mixture should be smooth and slightly fluffy.
- Gently fold in the chilled whipped topping, just until combined. Be careful not to overmix, to keep the airy texture.
- Pour the creamy filling over the chilled crust, smoothing the top with a spatula. Tap the pan gently on the counter to remove any air bubbles and to level the surface.
- Cover the pan with plastic wrap or foil and place it in the refrigerator. Chill for at least 4 hours, preferably overnight, until the filling is firm and set.
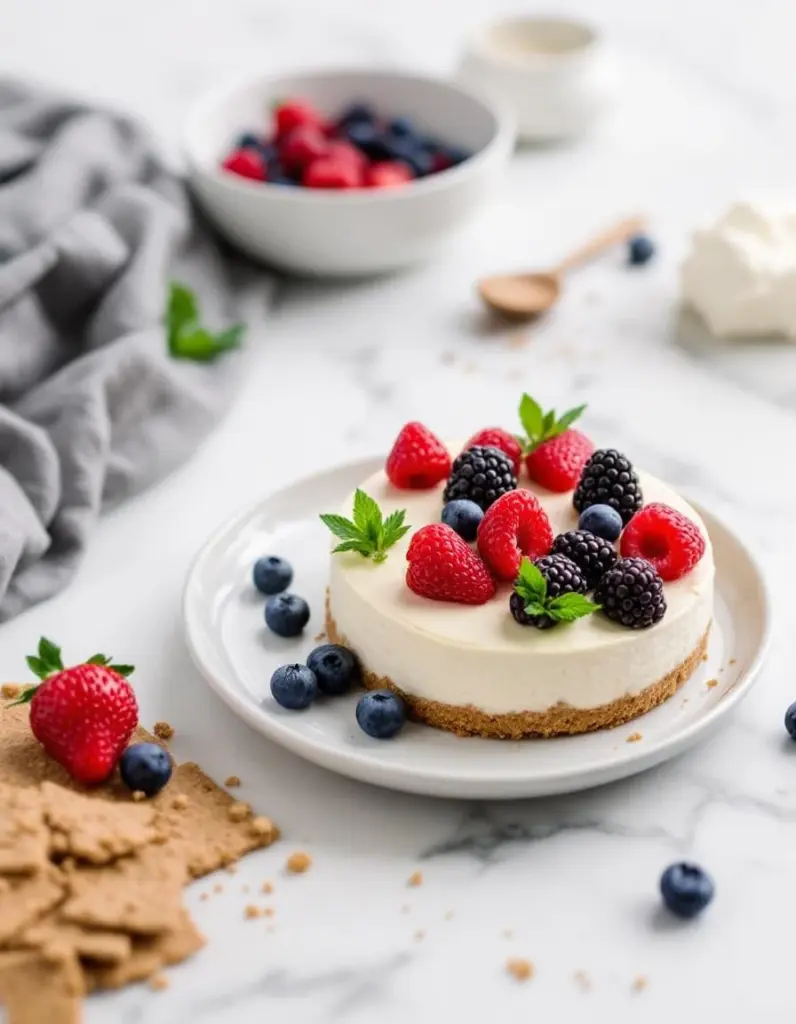
- Once chilled and set, run a knife around the edges before removing the sides of the springform pan. Garnish with fresh berries or your favorite fruit topping if desired.
- Slice into pieces with a sharp knife, serve immediately, and enjoy the creamy, crunchy contrast of this no-bake cheesecake.
Notes
Common mistakes and how to fix them
- FORGOT to chill the whipped cream: It won’t hold peaks. FIX by refrigerating at least 30 minutes.
- DUMPED the crust before pressing: It crumbles or sticks unevenly. FIX by pressing firmly into the pan.
- OVER-TORCHED the crust: It turns dark and bitter. FIX by baking at a lower temp or removing early.
- MISSED the set time: Cheesecake stays soft and runny. FIX by giving it enough time in the fridge to firm up.
Make-Ahead and Storage Tips
- You can prepare the crust and filling a day in advance, then assemble and chill overnight for best texture.
- The cheesecake can sit in the fridge for up to 48 hours, but after 24 hours the flavor starts to mellow and mellow out.
- If freezing, wrap tightly and store for up to 2 weeks; thaw in the fridge for several hours before serving.
- The flavors deepen slightly overnight, so expect a richer, more integrated taste if it rests longer.
- Reheat is not necessary—just serve straight from the fridge. For slightly softened texture, let it sit at room temperature for 10 minutes, then check for creamy smoothness and faintly chilled coolness.
FAQs
1. Can I use light cream cheese?
Use full-fat cream cheese for a rich, smooth texture with just the right tang. Low-fat options can make the filling softer and less stable.
2. Can I substitute cream cheese?
Yes, but it may result in a slightly softer, less firm cheesecake. Chill it longer to help set the texture.
3. Can I skip whipped topping?
Heavy cream whipped until soft peaks adds airy fluff, contrasting the creamy base. Store-bought whipped topping is a quick alternative.
4. Can I use a sugar substitute?
Sugar balances the tartness; honey or maple syrup can add a different flavor but might alter the texture slightly.
5. How long should I chill it?
Chill the cheesecake at least 4 hours, preferably overnight, to let it set fully. Sensory cue: the surface should feel firm and smooth, not jiggly.

Hi, I’m Anjali Arora — the curious heart behind Feast Chase.
To be honest, I’ve always felt most at ease in my own company. I’m not exactly a people-person (small talk still makes me cringe), but there are two things I’ve always loved deeply: animals and food.