Ham and cheese sliders are my go-to for quick gatherings, but I’ve recently started experimenting with a spicy honey glaze that turns them into something more exciting. It’s funny how a simple tweak can make a familiar favorite feel new again, especially when friends ask for the recipe without knowing what’s in that secret sauce.
This recipe is all about balancing comfort and a little unexpected kick. I love how the sweetness of honey and a hint of spice can elevate the richness of ham and melted cheese, making each bite feel like a small celebration. It’s the kind of dish that’s perfect for lazy weekends or when you want something cozy but with a twist.
Focusing on the nostalgic comfort of ham and cheese sliders, but elevating them with a secret spicy honey glaze that adds a surprising kick, transforming a simple snack into a memorable, flavor-packed bite.
The story behind this recipe
I first stumbled on the idea when I was hosting a lazy Sunday brunch and needed something both quick and satisfying. The smell of warm ham and melting cheese always takes me back to childhood picnics and family dinners, but I wanted to give it a little modern twist. That’s when I started experimenting with different glazes and realized a spicy honey drizzle could turn simple sliders into something special, with a little kick that surprises. It’s become a go-to for when I want comfort food that feels a bit more grown-up, yet still cozy enough to share with friends.
Key ingredients and tips
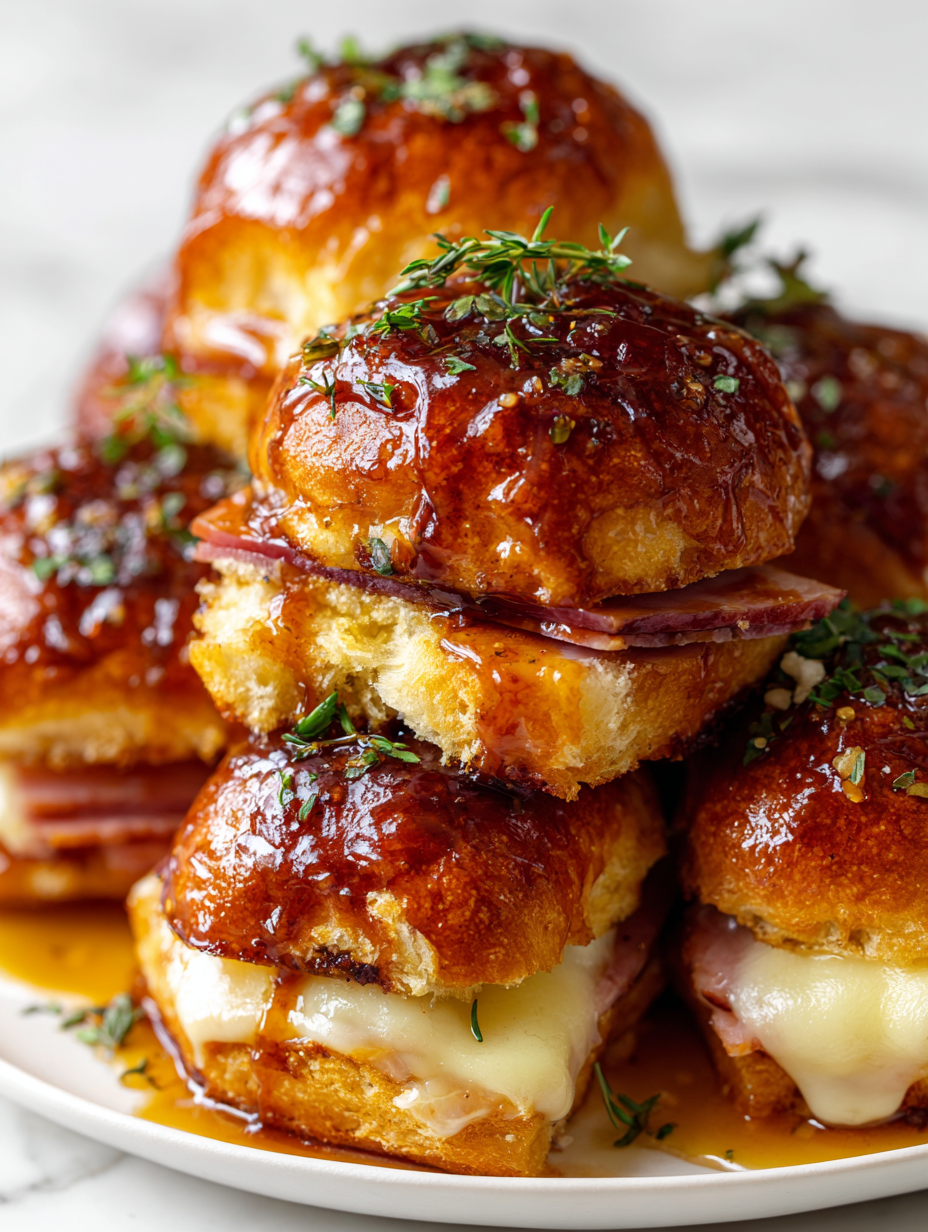
- Ham: I like using thinly sliced, honey-glazed ham for a sweet-salty punch, but turkey works well if you want lighter. Try different meats to switch up the flavor.
- Cheese: Melty cheddar is classic, but I’ve also used Swiss or provolone for a milder, nutty note. Look for a cheese that melts smoothly, so each bite is gooey.
- Slider Buns: Soft, buttery buns are best—think brioche or hearty dinner rolls. Toast them lightly before assembling to add a subtle crunch and prevent sogginess.
- Spicy Honey Glaze: I mix honey with a dash of hot sauce and a squeeze of lemon—oozy and bright. Adjust the heat to your taste, but don’t skip the citrus for that zing.
- Butter: I melt a bit of butter to brush on the buns for golden color and rich flavor. For a healthier twist, use olive oil, but expect a subtler finish.
- Optional Toppings: A sprinkle of poppy seeds or a dash of paprika on top adds visual flair and flavor depth. Play around with herbs or crispy onions for extra texture.
- Seasonings: A pinch of garlic powder or onion powder in the butter enhances the savory notes. Keep it simple, but don’t be afraid to experiment with herbs.
Spotlight on key ingredients
Ham:
- I like using thinly sliced, honey-glazed ham for a sweet-salty punch, but turkey works well if you want lighter. Try different meats to switch up the flavor.
- Cheese: Melty cheddar is classic, but I’ve also used Swiss or provolone for a milder, nutty note. Look for a cheese that melts smoothly, so each bite is gooey.
- Slider Buns: Soft, buttery buns are best—think brioche or hearty dinner rolls. Toast them lightly before assembling to add a subtle crunch and prevent sogginess.
Cheese:
- Spicy Honey Glaze: I mix honey with a dash of hot sauce and a squeeze of lemon—oozy and bright. Adjust the heat to your taste, but don’t skip the citrus for that zing.
- Butter: I melt a bit of butter to brush on the buns for golden color and rich flavor. For a healthier twist, use olive oil, but expect a subtler finish.
- Optional Toppings: A sprinkle of poppy seeds or a dash of paprika on top adds visual flair and flavor depth. Play around with herbs or crispy onions for extra texture.
Notes for ingredient swaps
- Dairy-Free: Use plant-based cheeses like cashew cheese or dairy-free slices. Expect a slightly different melt and less richness.
- Gluten-Free: Swap slider buns for gluten-free rolls or lettuce wraps. They won’t soak up the glaze the same way but keep the flavors.
- Low-Sodium: Choose reduced-sodium ham and cheese, or rinse cured meats briefly to cut salt without losing flavor.
- Sweetener Variations: Replace honey with maple syrup or agave nectar for a different sweetness profile, slightly darker and more robust.
- Spicy Kick: Omit hot sauce for a milder glaze, or add a dash of smoked paprika for a smoky heat instead of traditional hot sauce.
- Cheese Alternatives: Try mozzarella or Monterey Jack for a milder, stretchier melt. Sharp cheeses give a punch of flavor.
- Meat Options: Use roasted turkey, roast beef, or even grilled chicken slices if ham isn’t your thing, adjusting cooking time slightly.
Equipment & Tools
- Baking dish: Holds the sliders and allows even baking.
- Sharp knife: For slicing the sliders cleanly.
- Brush: To apply the honey glaze evenly.
- Aluminum foil: To cover the sliders during baking and keep moisture in.
- Oven: To bake and broil the sliders to perfection.
Step-by-step guide to ham and cheese sliders
- Gather all your ingredients and preheat your oven to 180°C (350°F).
- Slice slider buns in half horizontally, keeping them attached on one side so they stay together.
- Lay the bottom halves of the buns in a greased 9×13 inch baking dish.
- Place slices of ham evenly over the buns, covering all the surface area.
- Layer slices of cheese over the ham, ensuring each slider will get gooey cheese in every bite.
- In a small bowl, mix honey, hot sauce, and lemon juice for the glaze. Brush this mixture generously over the top buns, focusing on the edges for a caramelized finish.
- Cover the sliders with aluminum foil, sealing the edges to keep the moisture in.
- Bake in the preheated oven for 15-20 minutes, or until the cheese is melted and the buns are golden brown around the edges.
- Remove the foil and broil for an additional 2-3 minutes if you want a crispier top. Watch closely to prevent burning.
- Take out of the oven and let rest for 5 minutes. This helps the cheese set slightly so it doesn’t ooze out when sliced.
- Slice through the sliders with a sharp knife, serving warm with extra glaze drizzled on top if desired.
Let the sliders rest for 5 minutes before slicing to allow the cheese to set. Serve warm, drizzled with any extra glaze or juices. For extra flair, sprinkle with herbs or poppy seeds before serving.
How to Know It’s Done
- Cheese is melted and bubbly, with a golden top after broiling.
- Buns are lightly toasted and have a golden hue on the edges.
- Filling is hot and gooey, with a fragrant spicy honey glaze on the surface.
Spicy Honey Glazed Ham and Cheese Sliders
Ingredients
Equipment
Method
- Preheat your oven to 180°C (350°F). Slice the slider buns in half horizontally, keeping them attached on one side so they stay together. Arrange the bottom halves in a greased baking dish.
- Layer slices of ham evenly over the buns, covering the entire surface. Follow with slices of cheese on top of the ham, ensuring each slider gets gooey, melted cheese.
- In a small bowl, whisk together honey, hot sauce, and lemon juice until well combined. Using a brush, generously coat the top buns with this spicy honey glaze, focusing on the edges for caramelization.
- Cover the baking dish tightly with aluminum foil to lock in moisture. Place in the preheated oven and bake for 15-20 minutes, until the cheese is bubbly and the buns are lightly golden.
- Remove the foil and switch to broil mode for 2-3 minutes, watching closely, until the tops are bubbly and golden brown. This adds a delicious crisp and caramelized finish.
- Take the sliders out of the oven and let them rest for 5 minutes. This helps the cheese set, making them easier to slice without oozing.
- Slice through the sliders with a sharp knife, serving warm. For an extra touch, drizzle any remaining glaze over the top and sprinkle with optional toppings like poppy seeds or paprika for added flair.
Pro tips for ham and cheese sliders
- Use room temperature butter for an even, golden glaze that melts quickly and evenly.
- Lightly toast buns before assembling to prevent sogginess and add a subtle crunch.
- Brush the glaze generously on top for a shiny, caramelized finish and extra flavor.
- Broil the sliders for 2-3 minutes until tops are bubbly and golden—stay close to avoid burning.
- Rest sliders for 5 minutes post-baking; this helps the cheese set and keeps everything neat.
- Use a sharp knife to slice through warm sliders; they’ll hold together better and look tidy.
- If cheese isn’t melting smoothly, cover with foil and bake a few extra minutes for gooey results.
Common mistakes and how to fix them
- FORGOT to check oven temperature → Use an oven thermometer for accuracy.
- DUMPED cheese too early → Broil until bubbly and golden, about 2-3 minutes.
- OVER-TORCHED buns → Cover with foil if they brown too quickly during broil.
- MISSED resting time → Let sliders rest 5 minutes to prevent cheese from oozing out.
Quick fixes for ham and cheese sliders
- When cheese isn’t melting → Increase oven time or broil briefly until bubbly.
- If buns are soggy → Toast them lightly before assembling for extra firmness.
- Splash with water if glaze burns → Lightly spritz with water and continue baking.
- Patch dry sliders → Serve with a drizzle of extra honey or spicy glaze for moisture.
- Shield edges from over-browning → Cover with foil during broil or baking to prevent burning.
Prep, store, and reheat tips
- Assemble the sliders up to a day in advance, then cover tightly with plastic wrap and refrigerate. The flavors meld and the bread stays fresh without becoming soggy.
- Store leftover sliders in an airtight container in the fridge for up to 2 days. Reheat in a 180°C (350°F) oven for 10-12 minutes until warm and the cheese is melty again, watching for crispiness.
- The spicy honey glaze can be made ahead and kept refrigerated for up to 3 days. Reapply with a brush before baking to restore shine and flavor.
- For freezer storage, wrap assembled sliders tightly in foil and freeze for up to 2 months. Thaw overnight in the fridge, then reheat as above. Expect a slightly softer bun but still flavorful.
- Reheating will soften the bread and intensify the glaze’s sweetness. Check for bubbling cheese and a warm, fragrant aroma. Add a quick broil if you want a touch of crisp on top.
Top questions about ham and cheese sliders
1. What kind of ham should I use?
Use thinly sliced ham and cheeses like cheddar or Swiss for the best melt. Look for slices that are firm but pliable, so they layer easily without tearing.
2. Can I use different bread?
Opt for soft, buttery slider buns or dinner rolls. Toast them lightly before assembling to add crunch and prevent sogginess.
3. How long do I bake the sliders?
Bake at 180°C (350°F) for about 15-20 minutes, until cheese is bubbly. Broil for 2-3 minutes to crisp the tops, but watch closely.
4. How do I get a good glaze on top?
Apply the spicy honey glaze with a brush before baking. It should be generously coated to caramelize nicely and add flavor.
5. How do I store leftovers?
Leftovers can be stored airtight in the fridge for up to 2 days. Reheat in a 180°C (350°F) oven for about 10 minutes until warm and melty.
6. Can I substitute the meat?
You can swap in turkey, roast beef, or grilled chicken slices. Adjust reheating time slightly and expect different flavor profiles.
7. How can I make it dairy-free?
Use dairy-free cheese like cashew-based or soy-based slices if you want a lactose-free version. Expect less gooeyness but still tasty.
8. Can I make these gluten-free?
For gluten-free, replace buns with gluten-free rolls or lettuce wraps. They won’t soak up the glaze as much but work well.
9. What if the cheese doesn’t melt?
When cheese isn’t melting, increase oven time or broil briefly until bubbly. Cover with foil if buns brown too quickly.
10. How do I fix burnt glaze?
Splash a bit of water on the top if glaze burns during broiling. It will create steam and prevent further burning.
These sliders are my go-to for when I want something familiar but with a little extra kick. The sweet heat from the honey glaze really makes them stand out, especially when you bite into that gooey cheese and tender ham. They bring back memories of lazy weekends and casual gatherings, yet feel special enough to serve to guests unexpectedly.
In a world of quick bites, this recipe keeps the focus on flavor and comfort, with just enough spice to keep things interesting. I find myself making them more often than I’d admit, especially on nights when I need a little something satisfying without fuss. Sometimes, the simplest ideas turn out to be the most memorable, and these sliders definitely fit that bill.

I’m Mayank, the creator, cook, and writer behind this blog. FeastChase is not just a collection of recipes — it’s a journey through tastes, memories, and moments that bring people together at the table.