This butter garlic peas recipe is my little secret for turning a humble vegetable into a cozy, indulgent side. I love how a simple handful of peas can be elevated with just butter and garlic, transforming them into something rich and aromatic. It’s one of those dishes I turn to when I want comfort on a busy weeknight, but still crave that feeling of having made something special.
The magic lies in the process—garlic gently sizzling in butter until fragrant, peas just heated through, bursting with freshness and a little sweetness. It’s a quick, honest dish that feels like a warm hug, no fuss required. Honestly, it’s become my go-to for making even the simplest meal feel a little more indulgent.
In a way, this dish is about appreciating the small things—those bright green peas, the aroma of garlic, the richness of butter. It’s a reminder that sometimes, a handful of ingredients, treated right, can shine all on their own. And right now, after months of heavier meals, I find myself craving these light, flavorful bites that remind me of spring, even if it’s still chilly outside.
Focusing on elevating simple peas with a rich, buttery garlic coating, this recipe reveals how humble ingredients can transform into a surprisingly indulgent side, perfect for when you want comfort without fuss.
The story behind this recipe
This dish started as a way to use up a bag of frozen peas during a hectic week. I wanted something quick, but with a little something extra—something that smelled like comfort but didn’t demand too much fuss. The butter and garlic combination always feels like a small celebration, turning everyday ingredients into a cozy, fragrant moment. It’s a reminder that simple can be satisfying, especially when the kitchen feels busy and loud.
Key ingredients at a glance
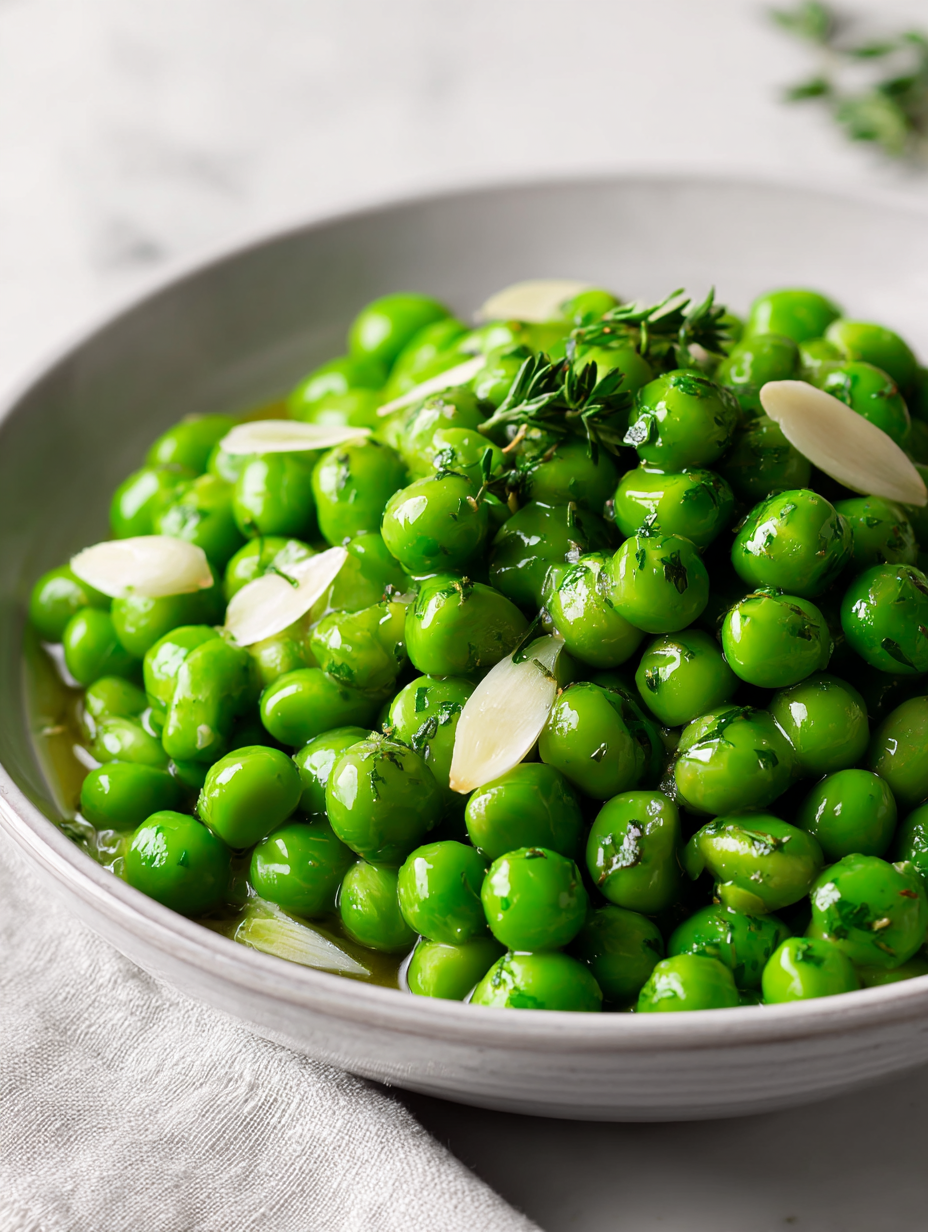
- Frozen peas: I love how bright and sweet they stay when cooked quickly, but fresh peas can be a sweeter, crunchier alternative if you peel them just before adding. Feel that pop of freshness when biting into them.
- Butter: I stick with unsalted for control, but salted butter adds a little more flavor right off the bat. When melting, it should smell rich and slightly nutty—don’t rush the browning stage unless you want a smoky note.
- Garlic: I prefer thinly sliced garlic for even crispiness and aroma. When frying, it should turn golden and fragrant within a minute—watch carefully to avoid bitter, burnt bits.
- Salt & Pepper: I season generously but taste as I go. Freshly cracked black pepper adds a lively bite that complements the sweetness of the peas, so don’t skimp on that.
- Optional herbs: A sprinkle of chopped parsley or mint at the end lifts the dish with a fresh, herbal brightness. Use sparingly if you want the peas to shine on their own.
- Lemon juice (if using): A squeeze right before serving brightens the whole dish. It’s a quick splash that transforms the buttery richness into something more lively and fresh.
Spotlight on key ingredients
Garlic:
- Frozen peas: I love how bright and sweet they stay when cooked quickly, but fresh peas can be a sweeter, crunchier alternative if you peel them just before adding. Feel that pop of freshness when biting into them.
- Butter: I stick with unsalted for control, but salted butter adds a little more flavor right off the bat. When melting, it should smell rich and slightly nutty—don’t rush the browning stage unless you want a smoky note.
- I prefer thinly sliced garlic for even crispiness and aroma. When frying, it should turn golden and fragrant within a minute—watch carefully to avoid bitter, burnt bits.
Notes for ingredient swaps
- Dairy-Free: Use olive oil or coconut oil instead of butter. It will add a different richness, slightly more fruity or nutty, but still satisfying.
- Vegan: Swap butter for vegan margarine or a good quality plant-based butter. Keep in mind, the flavor might be a touch milder.
- Fresh Peas: If fresh peas are in season, use them raw or blanch briefly; they’ll be crunchier and more subtly sweet.
- Frozen Peas: Still the easiest option. No need to thaw—just toss them straight in for quick heating and bright color.
- Garlic: Use garlic powder in a pinch—start with half the amount, as it’s more concentrated and can overpower if overused.
- Herbs: Skip or substitute with basil or chives for a different fresh note. Dried herbs work too, but add them at the end to preserve flavor.
- Lemon Juice: If you don’t have lemon, a splash of vinegar (like apple cider) can add a similar bright note, just a touch more subtle.
Equipment & Tools
- Medium skillet: To cook peas evenly without burning.
- Sharp knife: For slicing garlic thinly.
- Spatula or wooden spoon: To stir and coat peas with butter and garlic.
- Measuring spoon: To measure garlic and butter portions precisely.
Step-by-step guide to butter garlic peas
- Equipment & Tools: Get a medium skillet (preferably non-stick) for even heat distribution; a sharp knife for slicing garlic; a spatula or wooden spoon for stirring; and a measuring spoon for garlic and butter portions.
- Heat the skillet over medium heat (about 160°C/320°F). Add 2 tablespoons unsalted butter, letting it melt fully. The butter should shimmer but not brown too quickly.
- Add 3-4 thinly sliced garlic cloves. Sizzle for about 30 seconds—smell that warm, toasted garlic aroma—be careful not to burn; if it browns too fast, reduce heat.
- Toss in 1 cup frozen peas directly from the bag. Stir well to coat all peas with butter and garlic. Cook for 2-3 minutes until peas are heated through and bright green, with a slight pop when pressed.
- Check for doneness: peas should be tender but still hold their shape, garlic crisp and fragrant, butter slightly thickened and glossy. If not, cook a minute longer, stirring occasionally.
- Season generously with salt and freshly cracked black pepper to taste. Optional: squeeze a splash of lemon juice for brightness. Stir to combine.
- Resting & Finishing: Transfer to a serving dish. Let sit for 1 minute to allow flavors to meld. Garnish with chopped parsley or mint if desired. Serve warm, ideally with a crusty bread or as a side.
Serve immediately after resting for 1 minute. Garnish with herbs if using. The peas will be sweet, buttery, and aromatic, making a cozy complement to any main.
How to Know It’s Done
- Peas are bright green and tender but not mushy.
- Garlic is golden and fragrant, not burnt or bitter.
- Butter is glossy and slightly thickened, coating the peas evenly.
Butter Garlic Peas
Ingredients
Equipment
Method
- Start by heating a medium skillet over medium heat until warm.
- Add 2 tablespoons of butter to the skillet and let it melt completely, shimmering gently as it coats the bottom.
- Once the butter is melted and fragrant—about 30 seconds—add the thinly sliced garlic to the pan.
- Sizzle the garlic until golden and fragrant, about 30 seconds to 1 minute, stirring frequently to prevent burning.
- Immediately add the frozen peas directly from the bag into the skillet, stirring well to coat them in the buttery garlic mixture.
- Cook the peas for 2-3 minutes, stirring occasionally, until they are heated through, tender, and vibrant green with a slight pop when pressed.
- Season generously with salt and freshly cracked black pepper, tasting and adjusting until balanced.
- If desired, squeeze a little lemon juice over the peas for a bright, fresh finish, then stir to combine.
- Remove the skillet from heat and transfer the peas to a serving dish. Garnish with chopped parsley or mint if you like a herbal touch.
- Serve immediately while the peas are still bright, glossy, and fragrant—perfect as a cozy side or a quick, satisfying bite.
Notes
Pro tips for perfect butter garlic peas
- Bolded mini-head: Use fresh garlic slices for even crispiness and fragrant aroma. They brown quickly—keep a close eye.
- Bolded mini-head: Sizzle garlic in butter until just golden, then remove from heat to prevent bitterness and burn spots.
- Bolded mini-head: Toss in frozen peas directly from the freezer; they’ll heat quickly and retain their bright color and sweetness.
- Bolded mini-head: Maintain medium heat to avoid overcooking the peas or burning the garlic—sensory cue: fragrant, not charred aroma.
- Bolded mini-head: Finish with a splash of lemon juice to brighten the rich butter and garlic flavor, adding a fresh zing.
- Bolded mini-head: Stir gently but thoroughly to coat peas evenly, ensuring every bite has that buttery garlic flavor.
- Bolded mini-head: Serve immediately to enjoy the peas at their peak tenderness and vibrant green color—don’t let them sit too long.
Common mistakes and how to fix them
- FORGOT to check heat level → Use medium heat, not too high to avoid burning garlic.
- DUMPED peas directly into hot butter → Sauté briefly first for even cooking and flavor.
- OVER-TORCHED garlic → Remove from heat as soon as it turns golden, not brown.
- MISSED the seasoning step → Taste and adjust salt and pepper before serving for balance.
Fast fixes for perfect peas
- When peas seem dull, splash a bit of lemon juice to brighten the flavor.
- If garlic burns too quickly, lower heat immediately and add a splash of water to cool the pan.
- Splash in a teaspoon of soy sauce when short on butter for an umami boost.
- Patch over overcooked peas with a pinch of fresh herbs and a drizzle of good olive oil.
- Shield the garlic from direct heat with a spoon when it crackles loudly to prevent bitterness.
Prep, store, and reheat tips
- Prep the garlic by slicing it thinly and store in an airtight container; it stays fresh for up to a week and is ready to sizzle when needed, releasing that pungent, toasted aroma.
- Freeze the peas in a single layer on a baking sheet, then transfer to a bag. They keep well for up to 3 months and can be cooked straight from frozen, maintaining their bright color and sweetness.
- Make the garlic butter in advance and keep it refrigerated for up to 2 days. Reheat gently until just melted, then proceed with the recipe for that fresh, fragrant flavor.
- Cooked peas can be stored in an airtight container in the fridge for up to 2 days. Reheat gently in a skillet over low heat, observing a quick shimmer and the peas regaining their lively green hue.
- If you need to reheat the dish, do so in a skillet over medium-low heat, stirring often. The peas should warm through while remaining tender, with the garlic still fragrant and the butter glossy.
Top questions about butter garlic peas
1. Can I use fresh peas instead of frozen?
Use frozen peas directly from the freezer; no need to thaw. They heat quickly and retain their brightness and sweetness.
2. Should I cook fresh peas differently?
Yes, but fresh peas might take slightly longer to cook and will have a crisper texture and more delicate flavor.
3. How can I make the flavor pop more?
Add a pinch of salt and a squeeze of lemon juice to enhance the natural sweetness and brightness of the dish.
4. How do I avoid burning the garlic?
Cook garlic until golden and fragrant, about 30 seconds; burnt garlic will add bitterness, so stay attentive.
5. How do I know when the peas are ready?
Stir gently after adding peas to coat them evenly with butter and garlic, and cook just until heated through, about 2-3 minutes.
6. What if the peas get overcooked?
If the peas turn dull or mushy, reduce heat and cook briefly or add a splash of water to refresh their texture.
7. Can I make this vegan?
Yes, you can substitute olive oil for butter for a vegan version, but it will lack the rich, creamy mouthfeel.
8. Can I use garlic powder instead of fresh garlic?
Using garlic powder is fine in a pinch; use half the amount, as it’s more concentrated and can overpower if overused.
9. What herbs go well with this dish?
Adding fresh herbs like parsley or mint at the end brightens the dish and adds a fresh herbal note.
10. How should I reheat leftovers?
Serve immediately for the best flavor and texture. Reheat gently in a skillet until just warmed, observing a quick shimmer and vibrant color.
This butter garlic peas dish is a quiet reminder that simple ingredients can deliver big flavor, especially when treated with care. It’s perfect for those moments when you need a quick, satisfying bite that still feels special. Honestly, it’s one of those little recipes I keep coming back to, especially when I crave something bright and comforting.
Whenever I make this, I think about how humble ingredients—peas, garlic, butter—can come together to create something unexpectedly nourishing. It’s a small, honest pleasure that fits into busy days or lazy weekends alike. And really, that’s what makes it worth holding onto.

Hi, I’m Anjali Arora — the curious heart behind Feast Chase.
To be honest, I’ve always felt most at ease in my own company. I’m not exactly a people-person (small talk still makes me cringe), but there are two things I’ve always loved deeply: animals and food.