This Strawberry Shortcake Layer Cake feels like a slice of my childhood, but with a grown-up twist. I love how the layers of fluffy sponge, sweetened cream, and fresh strawberries come together—each bite a mix of nostalgia and celebration. It’s imperfect, a little messy even, but that’s exactly what makes it so charming on a family table or a casual get-together.
I’ve always been drawn to the way this cake invites everyone to dig in, to get a little strawberry juice on their fingers, to laugh at the crumbs on their lap. It’s a dessert that’s meant to be shared without fuss, with that irresistible combo of fruity brightness and buttery softness. Making it feels like creating a little moment of joy, one that’s honest and unpolished but utterly memorable.
Focusing on how this layered cake can be a nostalgic centerpiece, blending childhood sweetness with adult finesse, and emphasizing the imperfect, hand-assembled charm that makes each slice feel personal.
The story behind this recipe
This cake is a nod to a summer afternoon I spent at my grandmother’s house, watching her assemble a towering strawberry shortcake with such care. It wasn’t just about the layers; it was the way she gently folded whipped cream, humming softly, while the sun cast a warm glow through the kitchen window. That moment, simple and true, made me realize how a humble dessert can hold so much love and memory. Now, every time I make this cake, I’m transported back to that slow, sweet afternoon, and I try to recreate that feeling in every slice.
Ingredient breakdown: key components
- Fresh strawberries: I love the way ripe berries smell—sweet, tangy, almost citrusy when sliced. Use the best you can find, and give them a gentle toss with a little sugar to boost their juice before layering.
- Whipped cream: Light, airy, and slightly sweet—this is what makes the cake feel lush. Whip until soft peaks form; if it’s too stiff, it can get gloopy. Keep it chilled until assembly.
- Sponge cake layers: I prefer a tender, moist crumb with a fine texture. Make sure your oven is fully preheated—about 180°C/350°F—so your layers bake evenly and stay soft.
- Sugar: It’s essential for sweetness and structure. I usually opt for superfine sugar—it dissolves faster, giving a smooth, melt-in-your-mouth sweetness. Adjust if you like it less sweet.
- Vanilla extract: Adds a warm, fragrant note that lifts the whole cake. Use good-quality vanilla, and don’t skimp. It brightens the cream and sponge with a subtle, floral aroma.
- Lemon juice: Just a splash brightens the strawberries and keeps them from browning. Use fresh lemon juice for that zesty, zingy kick—nothing bottled can quite match that freshness.
- Cake flour: I stick with cake flour for a tender crumb—less gluten, more softness. If you don’t have it, use all-purpose but sift it well and consider adding a touch more baking powder for lift.
Spotlight on key ingredients
Strawberries:
- Fresh strawberries: I love the way ripe berries smell—sweet, tangy, almost citrusy when sliced. Use the best you can find, and give them a gentle toss with a little sugar to boost their juice before layering.
- Whipped cream: Light, airy, and slightly sweet—this is what makes the cake feel lush. Whip until soft peaks form; if it’s too stiff, it can get gloopy. Keep it chilled until assembly.
Key flavor components:
- Sponge cake: I prefer a tender, moist crumb with a fine texture. Make sure your oven is fully preheated—about 180°C/350°F—so your layers bake evenly and stay soft.
- Sugar: It’s essential for sweetness and structure. I usually opt for superfine sugar—it dissolves faster, giving a smooth, melt-in-your-mouth sweetness. Adjust if you like it less sweet.
- Vanilla extract: Adds a warm, fragrant note that lifts the whole cake. Use good-quality vanilla, and don’t skimp. It brightens the cream and sponge with a subtle, floral aroma.
Notes for ingredient swaps
- Dairy-Free: Coconut cream works beautifully for whipped cream, offering a rich, slightly tropical flavor—just chill, whip, and fold in gently.
- Gluten-Free: Almond meal or gluten-free flour blend can replace cake flour, but the texture might be a tad denser and nuttier.
- Sweetener Swap: Honey or agave syrup can replace sugar in the sponge, but reduce the liquid slightly and expect a softer crumb.
- Fresh Strawberries: Frozen berries thawed and drained can be used if out of season, though they may be slightly less vibrant and juicy.
- Vanilla Essence: Use vanilla bean paste for a more intense, fragrant flavor—less sweet, more aromatic, and speckled with tiny vanilla seeds.
- Lemon Juice: Lime juice offers a similar bright, zesty punch—just adjust slightly for acidity and flavor balance.
- Sugar Type: Use granulated instead of superfine sugar if that’s what you have, but it might take a bit longer to dissolve fully.
Equipment & Tools
- Cake pans: Shape and bake the sponge layers.
- Parchment paper: Prevent sticking and ensure easy removal.
- Electric mixer: Whip eggs and cream efficiently.
- Spatula: Fold ingredients gently.
- Cooling rack: Cool cakes evenly and prevent sogginess.
- Serrated knife: Slice layers cleanly.
- Cake turntable: Ease even decorating (optional).
Step-by-step guide to layer cake
- Equipment & Tools: Gather three 20 cm (8-inch) round cake pans, parchment paper, electric mixer, mixing bowls, spatula, serrated knife, cake turntable (if available), and a cooling rack.
- Preheat your oven to 180°C (350°F). Line the cake pans with parchment paper and lightly butter the sides.
- Make the sponge cake: In a large bowl, beat 4 large eggs with 200g (1 cup) superfine sugar on medium-high speed until thick, pale, and tripled in volume—about 8 minutes. The mixture should fall in thick ribbons when lifted.
- Sift 200g (about 1 2/3 cups) cake flour and gently fold into the egg mixture in three additions, using a spatula, just until combined. Be careful not to deflate the batter.
- Divide the batter evenly into the prepared pans. Smooth the tops with a spatula.
- Bake for 20-25 minutes, or until the cakes are golden and a toothpick inserted in the center comes out clean. The edges should pull slightly from the sides of the pan.
- Cool the cakes in their pans on a wire rack for 10 minutes. Then turn out onto the rack and peel away the parchment paper. Let fully cool before assembling, about 1 hour.
- Prepare the strawberries: Hull and slice 500g (about 1 pound) ripe strawberries. Toss with 2 tablespoons sugar and let sit for 15 minutes to release juices.
- Whip the cream: In a chilled bowl, beat 300ml (about 1 1/4 cups) heavy cream with 2 tablespoons sugar and 1 teaspoon vanilla until soft peaks form. Keep chilled until assembly.
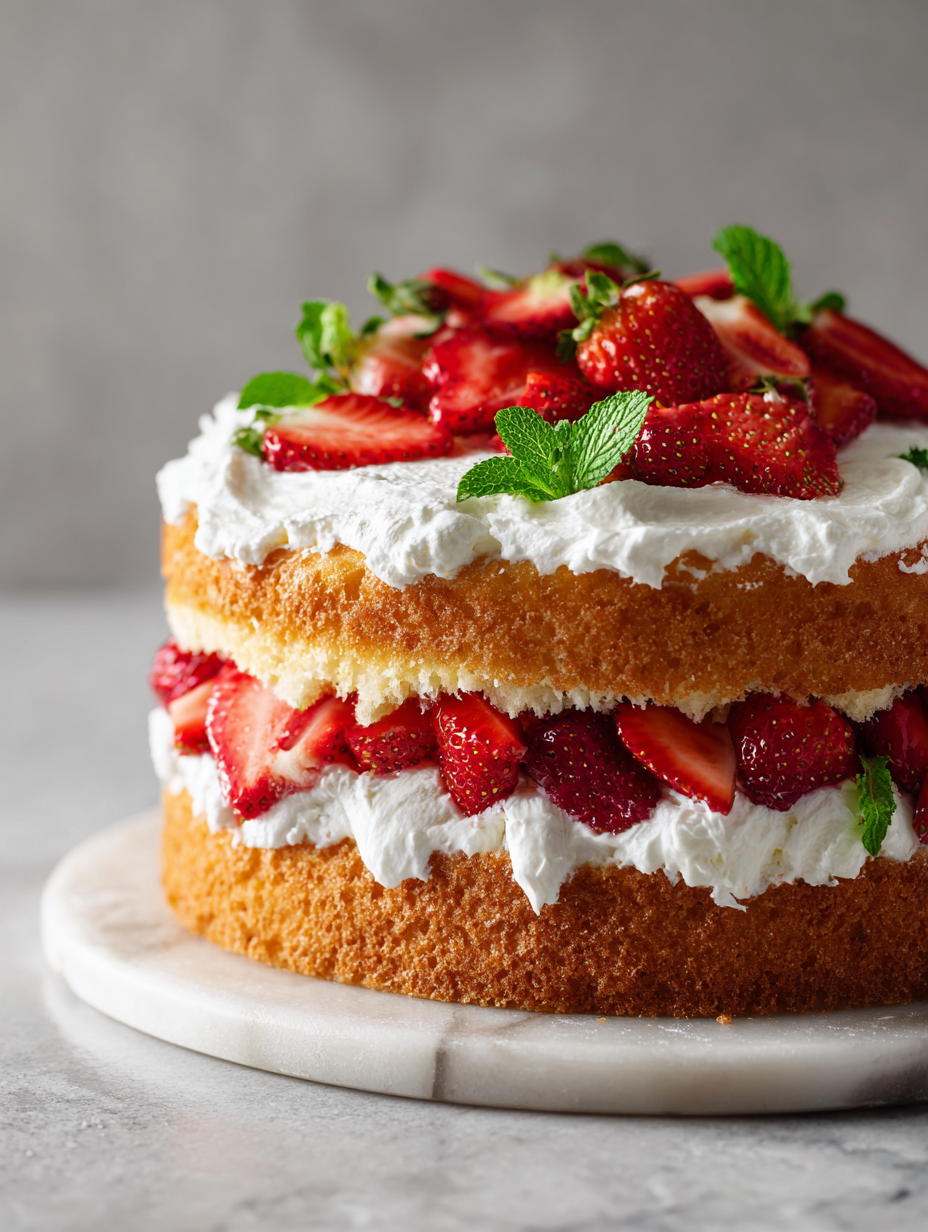
- Assemble the cake: Place one layer on a serving plate. Spread a generous layer of whipped cream, then top with half of the sugared strawberries and their juice. Repeat with the second layer.
- Top with the final cake layer. Cover the top and sides with remaining whipped cream. Decorate with whole strawberries or additional slices if desired.
- Rest the assembled cake in the fridge for at least 1 hour before serving to let flavors meld and the cream set.
- Finishing: Slice carefully with a serrated knife, wiping it clean between cuts. Serve chilled, ideally within 24 hours for freshness.
Let the assembled cake rest in the fridge for at least an hour. Slice with a serrated knife, wiping it clean between cuts. Serve chilled and enjoy the layered textures and fresh berry aroma.
How to Know It’s Done
- Cake layers are golden and spring back when lightly pressed.
- Cake is cooked through with no wet batter on a toothpick test.
- Strawberries are juicy and fragrant, not watery or dull in color.
Strawberry Shortcake Layer Cake
Ingredients
Equipment
Method
- Preheat your oven to 180°C (350°F). Line three 20 cm (8-inch) round cake pans with parchment paper and lightly butter the sides to prevent sticking.
- In a large mixing bowl, beat the eggs and superfine sugar with an electric mixer on medium-high speed. Whisk for about 8 minutes until the mixture becomes thick, pale, and triples in volume, with a ribboning effect when lifted.
- Sift the cake flour over the egg mixture in three parts. Gently fold each addition in with a spatula, taking care not to deflate the batter and maintaining its airy texture.
- Divide the batter evenly among the prepared pans and smooth the tops with a spatula. Place them into the oven and bake for 20-25 minutes, until the cakes are golden and a toothpick inserted in the center comes out clean.
- Remove the cakes from the oven, let them cool in their pans for 10 minutes, then transfer to a cooling rack. Peel off the parchment paper and let the layers cool completely for about an hour.
- While the cakes cool, hull and thinly slice the strawberries. Toss them with 2 tablespoons of sugar and let sit for 15 minutes to macerate, releasing their juices and enhancing their flavor.
- Pour the chilled heavy cream into a mixing bowl. Using the electric mixer, whip on medium-high speed until soft peaks form, about 3-4 minutes. Keep the whipped cream in the fridge until ready to assemble.
- Place one sponge layer on a serving plate. Spread a generous layer of whipped cream over the top, then evenly distribute half of the macerated strawberries and their juices. Repeat with the second layer, then top with the final sponge layer.
- Cover the top and sides of the cake with the remaining whipped cream, using a spatula to create a rustic, inviting finish. Decorate with whole strawberries or additional slices if desired.
- Refrigerate the cake for at least 1 hour to set the cream and allow flavors to meld. Slice with a serrated knife, wiping it clean between cuts for neat slices. Serve chilled and enjoy the luscious layers and fresh berry aroma.
Pro tips for perfect layers
- Use fresh, ripe strawberries—bright, fragrant, and juicy for the best flavor and color.
- Chill your whipped cream bowl and beaters—cold tools help achieve fluffy, stable peaks.
- Gently fold the flour into the egg mixture—sacrificing volume leads to dense layers.
- Level your sponge layers with a serrated knife—smooth, even layers make stacking easier.
- Let the assembled cake rest in the fridge—sets the cream and melds flavors for cleaner slices.
- Use a light hand when spreading whipped cream—thick layers can slide or become uneven.
- Decorate with whole strawberries just before serving—freshness and visual pop last longer.
Common mistakes and how to fix them
- FORGOT to check oven temperature → use an oven thermometer for accuracy.
- DUMPED strawberries on the cake too early → wait until strawberries release juice and are macerated.
- OVER-TORCHED the sponge layers → bake until golden and a toothpick comes out clean, not dry.
- MISSED folding ingredients gently → use a light hand to keep batter airy and moist.
Fast fixes and pantry swaps
- When strawberries are too watery, splash a bit of lemon juice to brighten and thicken their juices.
- If the whipped cream deflates, patch it up with a quick re-whip for added fluff and stability.
- Splash a pinch of salt into your sponge batter to prevent over-sweetness and enhance flavor.
- Shield the cake with foil if the edges brown too quickly during baking, then lower oven temp slightly.
- DUMPED too much sugar in the strawberries? Rescue by adding a splash of lemon to balance sweetness.
Prep, store, and reheat tips
- Prep the sponge layers a day in advance; wrap tightly and store at room temperature for a soft, fresh crumb that’s ready to assemble.
- Slice and macerate strawberries ahead of time; keep covered in the fridge for up to 24 hours, juices intensify, adding vibrant flavor.
- Whip the cream up to 2 hours before serving; keep chilled, and re-whip briefly if needed to restore fluffiness—watch for slight deflation.
- Assemble the cake a few hours before serving, then loosely cover and refrigerate; flavors meld, and the structure stays intact for a moist finish.
- Cake keeps well in the fridge for up to 24 hours; after that, the cream may start to weep slightly, and strawberries lose some brightness.
- Reheat slices briefly in the fridge or at room temp—just enough to take the chill off, and enjoy the contrast of cool cream with warm cake.
FAQs about Strawberry Shortcake Layer Cake
1. How do I choose the best strawberries?
Use fully ripe, fragrant strawberries, sliced just before layering to keep their juiciness and bright flavor.
2. What’s the secret to fluffy whipped cream?
Chill your mixing bowl and beaters for whipped cream; it whips up fluffier and holds peaks longer.
3. How do I know when the cake layers are done?
Bake the sponge until it’s golden and a toothpick inserted in the center comes out clean, about 20-25 minutes.
4. Why is my cake falling apart during assembly?
Let the cakes cool completely before assembling; warm layers will melt the cream and make the cake messy.
5. How should I prepare the strawberries for the best flavor?
Macerate strawberries with a little sugar and lemon juice to release their juices, enhancing flavor and preventing sogginess.
6. Can I make the cake ahead of time?
Cover the assembled cake loosely and refrigerate for at least an hour to help flavors meld and set the cream.
7. How do I get even cake layers?
Use a serrated knife to slice layers evenly; a gentle sawing motion helps keep the layers intact.
8. What do I do if my whipped cream loses volume?
If the whipped cream flattens, briefly re-whip to restore fluffiness before decorating.
9. When should I add the strawberries for the best presentation?
Decorate just before serving with fresh strawberries to keep them vibrant and juicy.
10. How long can I keep the cake in the fridge?
Store leftovers in the fridge, covered, for up to 24 hours to keep the cream fresh and strawberries bright.
This cake isn’t just about strawberries and cream; it’s about capturing a moment of simple joy, messy fingers and all. Each slice has a little piece of summer, a touch of childhood nostalgia, and a dash of pride in pulling it all together.
In a world that sometimes feels frantic, this dessert reminds me that the best things are often imperfect, shared freely, and enjoyed with a bit of chaos. It’s a reminder to savor the sweetness, both in the cake and in the everyday moments that make life rich.

I’m Mayank, the creator, cook, and writer behind this blog. FeastChase is not just a collection of recipes — it’s a journey through tastes, memories, and moments that bring people together at the table.