Spring’s first flush of peas always feels like a small miracle, sweet and just bursting with freshness. I love tossing them into pasta, where their bright flavor cuts through the creamy richness like a little burst of sunshine. It’s a dish that feels both nostalgic and lively, perfect for those early season evenings when everything feels just a little bit more hopeful.
There’s something satisfying about blending simple ingredients into something that tastes complex and indulgent. I often make this creamy pea pasta when I want a quick, comforting meal that still feels special. It’s a reminder that the best flavors are often the simplest—fresh peas, good butter, and good pasta—turned up a notch with a splash of lemon or a handful of fresh herbs.
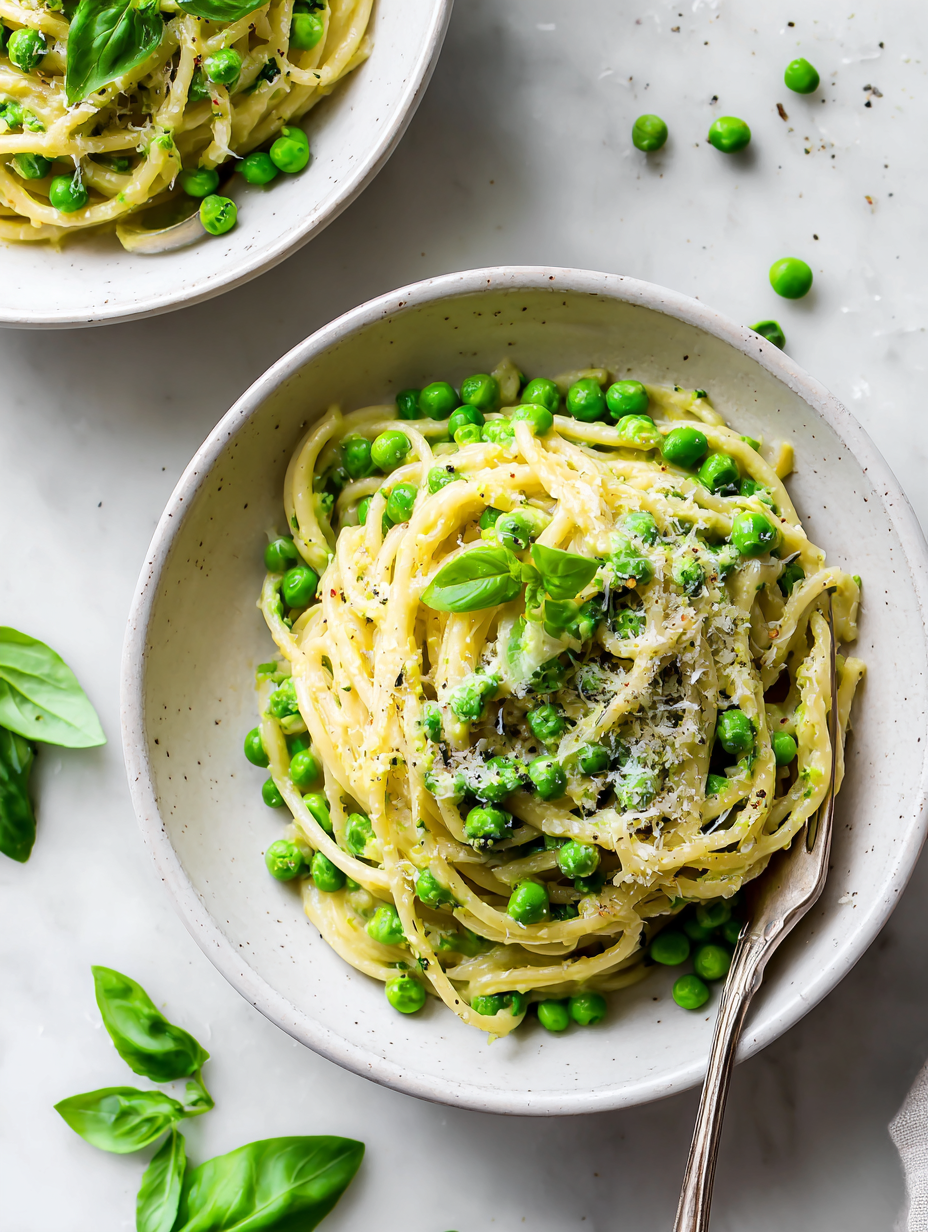
Using fresh spring peas to bring a vibrant, sweet contrast to the creamy richness of the pasta, making it a celebration of seasonal flavors.
The story behind this recipe
- This recipe came together one spring evening when I had a handful of fresh peas and a craving for something bright and comforting. I remember the way their sweet, almost grassy flavor made me think of childhood gardens and lazy weekend afternoons. It was a spontaneous idea—blend the freshness of peas with creamy pasta, and suddenly dinner felt like a celebration of the season.
- I like to think of this dish as a little ode to the fleeting beauty of early spring. It’s simple, honest, and full of those small moments that remind me why I love cooking—turning everyday ingredients into something that feels special. Every time I make it, I’m transported back to that evening, with the scent of peas and melting butter filling the kitchen air.
- heading
Ingredient breakdown: key components
- Fresh green peas: Their sweet, slightly grassy flavor makes this dish pop. Use fresh if possible; frozen works in a pinch, just defrost and drain well.
- Pasta: I prefer linguine or fettuccine for a good surface area that catches the sauce. Cook until just al dente—about 1 minute less than package suggests—so it holds up when combined.
- Butter: Adds richness and a silky texture. Use good quality, unsalted butter, and let it melt slowly to release a nutty aroma before tossing in your peas.
- Lemon juice: Brightens everything. A splash of fresh lemon juice at the end lifts the dish, especially if your peas are very sweet. Skip if you prefer a milder flavor.
- Garlic: I love sautéing minced garlic until fragrant but not browned—about 30 seconds on medium heat. Overcooked garlic turns bitter and can overpower the delicate peas.
- Parmesan: Freshly grated for the best flavor and melt. Add it gradually, tasting as you go, to achieve that perfect creamy, cheesy consistency. Skip if dairy-free.
- Olive oil: Drizzle a little good-quality extra virgin olive oil just before serving for added shine and flavor. It also helps tie all the elements together visually and taste-wise.
Spotlight on key ingredients
Fresh green peas:
- Their bright sweetness and slightly grassy aroma really make this dish pop. Use fresh if you can; frozen works, just defrost and drain well.
- Pasta: I prefer linguine or fettuccine for maximum sauce catch. Cook until just al dente—about 1 minute less than package suggests—so it keeps its bite when combined.
- Butter: Adds that silky richness. Use good quality, unsalted butter, and let it melt slowly to bring out a nutty, toasty smell before mixing in the peas.
Garlic:
- Parmesan: Freshly grated melts beautifully into the sauce, creating that irresistible cheesy silkiness. Add gradually, tasting as you go, for perfect creaminess.
- Lemon juice: Brightens the entire dish with a clean, zesty punch. Add at the end for a fresh lift, especially if your peas are very sweet and delicate.
- Sautéed just until fragrant, about 30 seconds. It should smell nutty and inviting, not bitter or burnt—watch the heat carefully.
Notes for ingredient swaps
- Dairy-Free: Use coconut milk or cashew cream instead of butter and Parmesan, for a rich but different flavor profile.
- Vegan: Swap butter for olive oil and skip Parmesan; add nutritional yeast or a splash of lemon for depth.
- Frozen Peas: No need to thaw if you’re in a pinch—just toss them straight into the sauté pan and cook until bright green and tender.
- Lemon Juice: If fresh lemon isn’t available, a splash of vinegar (white or apple cider) can brighten the dish, but it won’t have the same zesty punch.
- Pasta: Whole wheat or gluten-free pasta works well here; just adjust cooking time slightly and expect a different texture—more hearty or tender.
- Herbs: Fresh mint or basil can replace or supplement parsley for a more aromatic, springy flavor.
- Olive Oil: Use flavored or toasted olive oil for extra depth—smoky or herby variations can add a new dimension.
Equipment & Tools
- Large pot: Boiling pasta efficiently
- Large skillet: Sautéing peas and garlic, forming the sauce
- Colander: Draining pasta and reserving cooking water
- Measuring spoons: Accurately adding lemon juice and olive oil
- Grater: Freshly grating Parmesan cheese
Step-by-step guide to creamy pea pasta
- Bring a large pot of salted water to a boil, about 2 liters (8 cups), with a pinch of salt. Add pasta (about 200g for two servings) and cook until just shy of al dente, around 1 minute less than package instructions, roughly 8-9 minutes at 100°C (212°F). Drain, reserving ½ cup of pasta water.
- While pasta cooks, heat a large skillet over medium heat. Add 2 tablespoons of butter. Once melted and bubbling, add 1 cup of fresh or thawed frozen peas. Sauté for 2-3 minutes until peas are bright green and slightly tender, releasing a sweet aroma.
- Push peas to one side of the pan. In the cleared space, add 2 cloves of minced garlic. Sauté for 30 seconds until fragrant but not browned. If garlic starts to brown too quickly, reduce heat or add a splash of olive oil to prevent bitterness.
- Return the peas to the center, then stir in the cooked pasta. Drizzle with 1 tablespoon of olive oil and a squeeze of lemon juice (about 1 teaspoon). Toss everything together, ensuring the pasta is coated and peas are evenly distributed. If the mixture seems dry, add reserved pasta water a tablespoon at a time until silky.
- Stir in ¼ cup of grated Parmesan cheese. Taste and adjust seasoning with salt and pepper. The cheese should melt and create a creamy sauce that clings to the pasta and peas. For a dairy-free version, skip cheese and add a splash of nutritional yeast or a dash of lemon zest for brightness.
- Cook for another 1-2 minutes on low heat, just to meld flavors. The sauce should be glossy and clingy, peas vibrant, pasta tender but firm. Check for seasoning and adjust if needed. Remove from heat.
- Serve immediately, garnished with additional Parmesan or herbs if desired. The pasta should be warm, creamy, and bursting with fresh, sweet pea flavor. If not eaten right away, keep warm in a low oven (around 80°C/175°F) for up to 20 minutes, covered loosely with foil.
Serve immediately while warm. Garnish with extra cheese or herbs if desired. If not eating right away, keep warm covered in a low oven for up to 20 minutes, avoiding direct heat to prevent drying.
How to Know It’s Done
- Pasta is al dente with a slight resistance when bitten.
- Peas are bright green, tender but not mushy, with a sweet aroma.
- Sauce is glossy and coats the pasta evenly without pooling.
Creamy Spring Pea Pasta
Ingredients
Equipment
Method
- Bring a large pot of salted water to a boil, then add the pasta. Cook until just shy of al dente, about 1 minute less than package directions, until it’s still firm but beginning to soften. Drain the pasta, reserving about half a cup of the starchy cooking water.
- While the pasta cooks, heat a large skillet over medium heat. Add the butter and let it melt slowly, filling the kitchen with a nutty aroma. Once melted, add the peas and sauté for 2-3 minutes until they turn bright green and start to tenderize.
- Push the peas to one side of the skillet, then add the minced garlic to the empty space. Sauté for about 30 seconds until fragrant, noticing a slight sizzle and a warm garlic aroma filling the air. Be careful not to let it brown too quickly.
- Mix the garlic into the peas, then add the drained pasta to the skillet. Drizzle with olive oil and squeeze in the lemon juice. Toss everything gently, allowing the oil and lemon to coat the pasta evenly. If the mixture seems dry, add a splash of the reserved pasta water to loosen the sauce to a silky consistency.
- Sprinkle the grated Parmesan cheese over the pasta and stir until it melts into a creamy sauce that clings to every strand. Taste and season with salt and pepper as needed, adjusting to your preference.
- Cook for another 1-2 minutes on low heat until the flavors meld beautifully and the sauce is glossy. The peas should remain vibrant and sweet, and the pasta tender but still al dente.
- Serve immediately, garnished with additional Parmesan or fresh herbs if desired. The dish should be warm, creamy, and bursting with the bright sweetness of spring peas. Enjoy this simple celebration of seasonal flavors.
Pro tips for creamy pea pasta
- Bloom the garlic: Sauté minced garlic gently until fragrant, about 30 seconds, to avoid bitterness.
- Reserve pasta water: Save a cup of starchy water before draining; it helps loosen and enrich the sauce.
- Brighten with lemon: Add lemon juice at the end to make the peas’ sweetness pop and balance the richness.
- Cook peas separately: Sauté fresh or frozen peas until just tender and vibrantly green for the best texture.
- Finish with cheese: Gradually stir in Parmesan off heat for a silky, cheesy sauce that clings to every strand.
- Use a large skillet: Sauté peas and garlic in a wide pan to maximize space and control over cooking.
- Add olive oil last: Drizzle a splash of good-quality olive oil just before serving for shine and flavor enhancement.
Common mistakes and how to fix them
- FORGOT to reserve pasta water → Use it to adjust sauce consistency.
- DUMPED all peas at once → Add gradually for even cooking and color retention.
- OVER-TORCHED garlic → Sauté on medium heat for fragrant, not bitter, garlic.
- SKIPPED tasting during cooking → Always taste and adjust seasoning as you go.
Quick fixes and pantry swaps
- When sauce is too thick, splash in hot pasta water to loosen and shimmer.
- Splash a bit of olive oil if pasta sticks together after draining.
- Patch over-salted pasta with a squeeze of lemon for bright relief.
- Shield overcooked peas by quickly stirring in a splash of cold water.
- Rescue a burnt garlic pan by deglazing with a splash of wine or broth.
Prep, store, and reheat tips
- Prep the peas: Shell fresh peas or measure out frozen; both can be prepped a day ahead and kept in the fridge. Keep in an airtight container for up to 24 hours to maintain their sweet, bright flavor.
- Cook the pasta in advance: Cook until just al dente, then drain and toss with a little olive oil to prevent sticking. Store in a sealed container in the fridge for up to 1 day; reheat briefly in boiling water or microwave, adding a splash of water to revive the texture.
- Make the sauce ahead: Prepare the sautéed peas and garlic, then let cool. Store in a jar or airtight container in the fridge for up to 24 hours. Reheat gently in a skillet, stirring until warmed through and fragrant again.
- Reheating tip: Gently warm the pasta and sauce separately, then combine in a skillet over low heat. Add a splash of reserved pasta water or olive oil to restore creaminess and shine. Expect the peas to be slightly softer, with a mellow sweetness that still brightens the dish.
Top questions about creamy pea pasta
1. Can I use frozen peas instead of fresh?
Use fresh peas for the sweetest flavor, but frozen peas work just as well—just defrost and drain before cooking.
2. Is this dish still tasty without cheese?
Yes, you can skip the cheese for a dairy-free version; add a splash of lemon or nutritional yeast for flavor.
3. How do I know when the pasta is perfectly cooked?
Cook the pasta until just al dente, about 1 minute less than package suggests, to keep it firm and not mushy.
4. When should I add lemon juice?
Add lemon juice at the end to brighten the dish and make the peas’ sweetness stand out more.
5. Why use a large skillet for sautéing?
Use a wide skillet to sauté the peas and garlic evenly; this helps control the cooking process.
6. Why should I save pasta water?
Reserve some pasta water before draining; it’s starchy and can help loosen the sauce if it gets too thick.
7. How do I prevent garlic from burning?
Be gentle with garlic—sauté just until fragrant, about 30 seconds, to avoid bitterness.
8. When is the best time to add cheese?
Stir in Parmesan after removing from heat to create a smooth, glossy sauce that clings to the pasta.
9. How should I reheat this dish?
Reheat leftovers gently in the microwave or on the stove, adding a splash of water or oil to revive creaminess.
10. Should I taste and adjust seasonings after cooking?
Adjust seasoning with salt and pepper as needed, especially if using frozen peas or store-bought pasta which can be less flavorful.
This dish captures the fleeting sweetness of spring peas, a reminder to savor seasonal ingredients at their peak. It’s simple, honest, and perfect for those evenings when you want something comforting but vibrant.
Every time I make this, I’m reminded that the best meals often come from just a few good ingredients, cooked with care and a little patience. It’s a humble dish that feels like a small celebration of the season, right in your own kitchen.

Hi, I’m Anjali Arora — the curious heart behind Feast Chase.
To be honest, I’ve always felt most at ease in my own company. I’m not exactly a people-person (small talk still makes me cringe), but there are two things I’ve always loved deeply: animals and food.