There’s a certain charm in the way homemade jalapeño poppers turn out—imperfect, rustic, and full of personality. I love how their uneven, slightly charred edges tell a story of busy hands and spontaneous moments in the kitchen. These poppers aren’t about perfection; they’re about embracing every little flaw that makes them feel real and homemade.
This recipe is my go-to for casual get-togethers or even just a cozy night in. I’ve learned to love the way the cheese oozes out in uneven patches, and how the peppers sometimes crackle fiercely on the baking sheet. It’s chaotic, it’s messy, but it’s honest food—something I find myself craving more and more.
In a world obsessed with perfect presentation, these poppers remind me that beauty often lies in the unpolished. They’re a testament to the joy of cooking without overthinking, just tossing ingredients together and letting the oven do its thing. Every bite is a little imperfect charm, and that’s exactly why I keep coming back to them.
Focusing on the imperfect, rustic charm of homemade jalapeño poppers, embracing uneven stuffing and charred edges that tell a story of a busy, loving kitchen rather than perfection.
The story behind this recipe
- I first made these poppers during a chaotic summer barbecue, when I needed something quick and satisfying that still felt special. The smoky smell of charred peppers mixed with melting cheese instantly took me back to childhood cookouts, but with a grown-up twist. Since then, they’ve become my go-to snack for casual gatherings, always a hit despite their rustic look.
- What keeps me coming back is the imperfect charm—they’re not polished, and that’s what makes them memorable. Sometimes the cheese leaks out in gooey patches, and the peppers get a little charred around the edges, but that’s part of the appeal. It’s honest, imperfect comfort food, made with my hands and a little bit of chaos.
- heading: The story behind this recipe
Key ingredients and tips
- Jalapeños: I pick firm, bright-green peppers with tight skins, ready to burst with heat. If they feel soft or wrinkled, I skip them for freshness.
- Cheddar cheese: I love a sharp, aged cheddar that melts smoothly and fills the pepper with a rich, gooey texture. Feel free to swap in Monterey Jack for a milder, creamier bite.
- Cream cheese: I use full-fat cream cheese for a velvety, indulgent filling. If you want a lighter version, try a Greek yogurt-based mix, but expect less creaminess.
- Bacon bits: I toss in crispy, smoky bacon to add crunch and depth. If you’re vegetarian, toasted breadcrumbs with smoked paprika make a lovely substitute, adding crunch and flavor.
- Garlic powder: I keep it simple with a dash of garlic powder for that subtle, aromatic kick. Fresh minced garlic can work too, but be careful not to burn it when mixing.
- Paprika or smoked paprika: I sprinkle a bit for color and a smoky undertone. It’s optional but adds a lovely hue and depth; skip if you want a cleaner look.
- Olive oil: I brush the peppers with a little oil before baking to encourage even charring and prevent sticking. Use any neutral oil you have—it helps develop that roasted aroma.
Spotlight on key ingredients
Jalapeños:
- I pick firm, bright-green peppers with tight skins, ready to burst with heat. If they feel soft or wrinkled, I skip them for freshness.
- Cheddar cheese: I love a sharp, aged cheddar that melts smoothly and fills the pepper with a rich, gooey texture. Feel free to swap in Monterey Jack for a milder, creamier bite.
- Cream cheese: I use full-fat cream cheese for a velvety, indulgent filling. If you want a lighter version, try a Greek yogurt-based mix, but expect less creaminess.
Cheddar cheese:
- I love a sharp, aged cheddar that melts smoothly and fills the pepper with a rich, gooey texture. Feel free to swap in Monterey Jack for a milder, creamier bite.
- Cream cheese: I use full-fat cream cheese for a velvety, indulgent filling. If you want a lighter version, try a Greek yogurt-based mix, but expect less creaminess.
Notes for ingredient swaps
- Dairy-Free: Swap cheddar for a nut-based cheese like cashew cheese. It melts less predictably but adds a creamy, rich note.
- Vegan: Use vegan cheese that melts well, such as coconut oil-based varieties. Expect a slightly different melt and flavor.
- Gluten-Free: Ensure any added breadcrumbs or coatings are certified gluten-free. You might skip them for a softer popper.
- Spicy Heat: Use milder peppers or remove seeds thoroughly for less heat. For more kick, add a dash of cayenne or hot sauce.
- Cheese Variations: Mix in Monterey Jack or mozzarella for stretchiness. Sharp cheddar adds a bold, tangy flavor.
- Bacon Substitute: Use smoked paprika and toasted breadcrumbs for crunch and smoky flavor without meat.
- Oil: Any neutral oil works—canola, vegetable, or even melted butter—to help get that lovely roasted aroma.
Equipment & Tools
- Baking sheet: To hold the peppers during baking and allow even heat distribution.
- Sharp knife: To cut the peppers and prepare them for stuffing.
- Small spoon or piping bag: To fill the jalapeño halves neatly and efficiently.
- Mixing bowl: To combine and prepare the cheesy filling.
- Pastry brush: To lightly brush the peppers with oil for better browning.
Step-by-step guide to poppers
- Preheat your oven to 200°C (390°F). Line a baking sheet with parchment or a silicone mat to catch drips and make cleanup easier.
- Prepare the peppers: Cut each jalapeño in half lengthwise. Use a spoon to carefully remove seeds and membranes—less heat, but still flavorful. Wear gloves if you’re sensitive.
- Mix the filling: In a bowl, combine shredded cheddar, softened cream cheese, minced garlic, and a pinch of smoked paprika. Stir until smooth and cheesy, with no lumps.
- Stuff the peppers: Use a small spoon or piping bag to fill each jalapeño half generously with the cheese mixture. Don’t overstuff—leave a little room to close the top.
- Seal the tops: Gently press the stuffed halves together or fold the peppers over slightly if they’re small enough. This keeps the filling in place during baking.
- Arrange on the baking sheet: Place the stuffed peppers cut-side up, leaving space between each. Brush lightly with olive oil for a glossy finish and better charring.
- Bake: Slide into the oven and bake for 15–20 minutes. Watch for bubbling cheese and a slight char on the edges. They should be hot and golden.
- Optional broil: For extra char, switch to broil for 2–3 minutes. Keep a close eye—they can go from perfect to burnt fast.
- Cool briefly: Let the poppers rest for 5 minutes after coming out of the oven. They’ll be hot and gooey, but the cheese needs a moment to set.
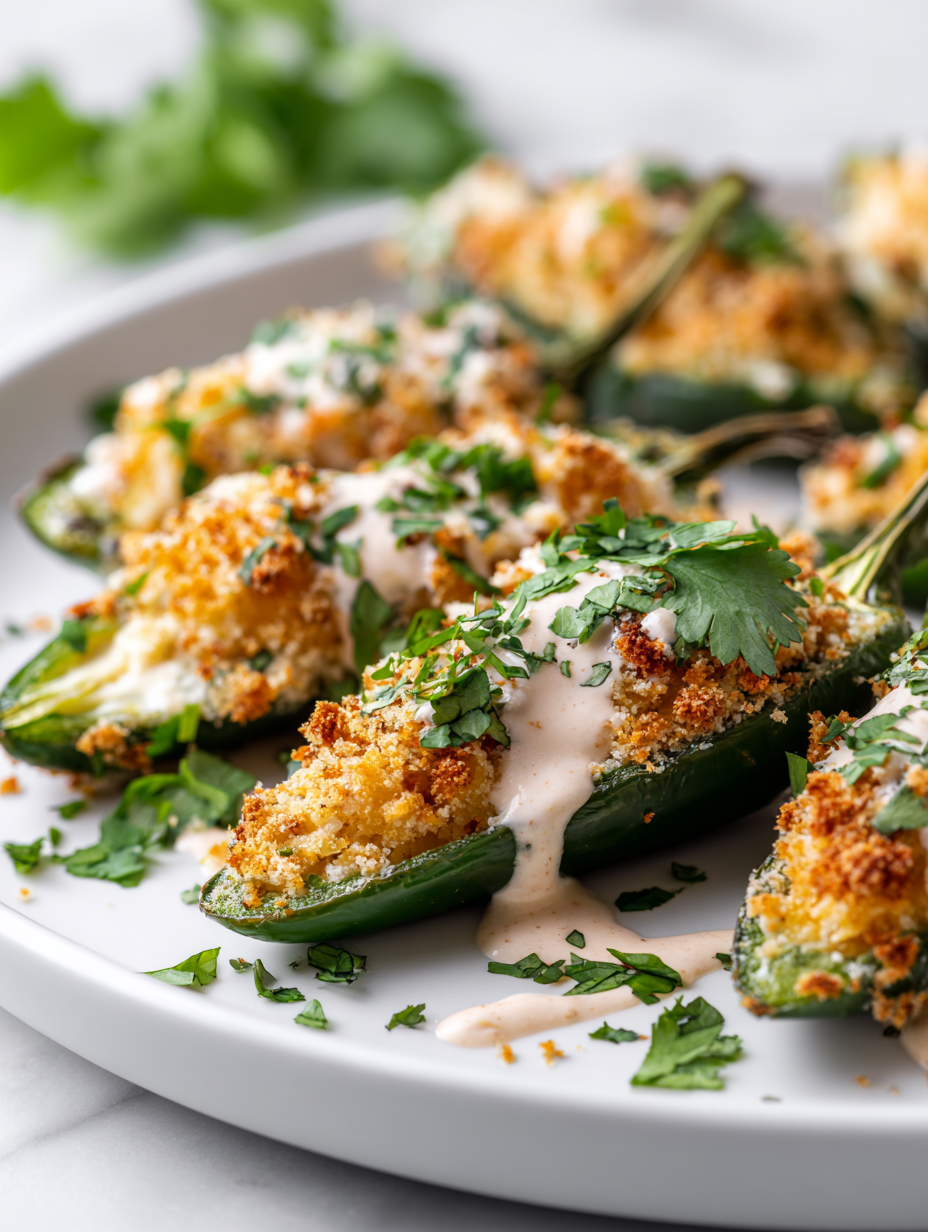
- Serve: Arrange on a platter. Garnish with chopped herbs or a squeeze of lime if desired. Enjoy that smoky, cheesy bite!
Let the poppers rest for about 5 minutes—they’ll be insanely hot right out of the oven. Serve warm, with a sprinkle of fresh herbs or a squeeze of lime for brightness.
How to Know It’s Done
- Cheese is fully melted and bubbling.
- Peppers are tender with slight charred edges.
- Filling is firm but gooey inside the peppers.
Rustic Homemade Jalapeño Poppers
Ingredients
Equipment
Method
- Preheat your oven to 200°C (390°F) and line a baking sheet with parchment paper.
- Use a sharp knife to carefully slice each jalapeño in half lengthwise, then scoop out the seeds and membranes with a small spoon. Wear gloves if you’re sensitive to heat.
- In a mixing bowl, combine the shredded cheddar, softened cream cheese, minced garlic, and smoked paprika. Stir until the mixture is smooth, creamy, and well blended.
- Using a small spoon or piping bag, fill each jalapeño half generously with the cheesy mixture. Gently press the filling in, slightly overfilling to ensure they’re packed full.
- Arrange the stuffed peppers cut-side up on the prepared baking sheet. Brush the peppers lightly with olive oil using a pastry brush to help them develop a nice charred, roasted appearance.
- Bake in the preheated oven for about 15–20 minutes, until the cheese is bubbling and the peppers have developed some charred, blistered edges.
- For extra char and smoky flavor, switch the oven to broil and cook for an additional 2–3 minutes, watching closely to prevent burning.
- Remove the poppers from the oven and let them rest for about 5 minutes — this helps the cheese set slightly and makes handling easier.
- Arrange on a platter and garnish with chopped herbs or a squeeze of lime if desired. Serve warm and enjoy the smoky, cheesy goodness with imperfect, charred edges.
Notes
Pro tips for perfect poppers
- Bolded tip: Use gloves when handling peppers to avoid lingering heat on your skin.
- Bolded tip: Chill the cheese mixture slightly for easier stuffing and less mess.
- Bolded tip: Broil the poppers for the last 2 minutes to develop a smoky, blistered skin.
- Bolded tip: If the cheese leaks out, gently press the peppers back together mid-bake.
- Bolded tip: Rotate the baking sheet halfway through baking for even charring.
- Bolded tip: Rest the poppers for 5 minutes after baking to let the cheese set before serving.
Common mistakes and how to fix them
- FORGOT to remove all seeds? Rinse peppers thoroughly to reduce heat and prevent bitterness.
- DUMPED cheese? Use room temp cheese for easier mixing and even stuffing.
- OVER-TORCHED peppers? Cover loosely with foil if edges brown too fast, then finish baking.
- MIXED fillings poorly? Mix cheese and spices thoroughly for consistent flavor and gooey texture.
Quick fixes and pantry swaps
- When peppers are too soft, splash with lemon juice to brighten flavors and refresh the bite.
- If cheese leaks out, patch with a little extra filling and bake a few minutes longer.
- DUMPED cheese? Chill the mixture before stuffing for easier handling and neater results.
- Over-torched edges? Shield with foil and lower oven temp slightly for a gentler finish.
- Splash a little water on the baking sheet if peppers stick; shimmer means they’re roasting evenly.
Prep, store, and reheat tips
- Stuff the peppers a day ahead and keep them covered in the fridge; the filling stays fresh for up to 24 hours, but the peppers may lose some crispness.
- Store baked poppers in an airtight container in the fridge for up to 2 days. Expect the cheese to firm up slightly, but reheat until bubbly for best texture.
- Reheat in a 180°C (350°F) oven for 8-10 minutes, or until warmed through and the cheese is melty again. Watch for slight drying; a quick spray of water can help.
- For freezer storage, assemble the unbaked poppers, freeze on a tray, then transfer to a bag. Bake directly from frozen, adding 5-7 minutes to the cooking time. The flavors intensify and the peppers develop a smoky aroma after freezing.
Top questions about Jalapeño Poppers
1. How do I pick the best jalapeños?
Look for firm, bright green peppers with tight skins. Soft or wrinkled peppers tend to be less fresh and may be bitter.
2. What cheese works best for stuffing?
Use sharp cheddar for a rich, cheesy flavor that melts beautifully. Monterey Jack or mozzarella will give a milder, gooey result.
3. How spicy will these poppers be?
Remove most seeds and membranes for milder heat. Keep some if you want a spicy kick, but wear gloves to avoid skin irritation.
4. How long do I bake the poppers?
Bake at 200°C (390°F) for 15-20 minutes until cheese bubbles and peppers are tender with charred edges.
5. Can I make these in advance?
You can prepare the stuffed peppers a day ahead, cover and chill in the fridge. Reheat in the oven until bubbly for best texture.
6. What if the cheese leaks out?
If cheese oozes out too much, gently press the peppers back together during baking or reduce oven temperature slightly to prevent burning.
7. Any tips for handling the peppers?
Use gloves when handling peppers to avoid lingering heat. Also, chill the cheese filling for easier stuffing and cleaner results.
8. How do I get a charred look?
For extra flavor, broil the poppers for 2-3 minutes at the end for a blistered, smoky finish.
9. How should I reheat leftovers?
Store leftovers in an airtight container in the fridge for up to 2 days. Reheat in a warm oven or toaster oven until hot and bubbly.
10. How do I fix overcooked peppers?
If peppers are too soft or burnt, cover with foil and lower oven temp slightly to finish cooking gently.
These poppers are a reminder that the best snacks often come from embracing a little chaos and imperfection in the kitchen. The smoky aroma, the gooey cheese, and that burst of heat make every bite worth the mess.
They’re perfect for casual nights, when you want something satisfying but not fussy. Plus, their rustic charm feels especially right now, when we’re craving honest, unpolished comfort food that brings people together.

I’m Mayank, the creator, cook, and writer behind this blog. FeastChase is not just a collection of recipes — it’s a journey through tastes, memories, and moments that bring people together at the table.